Visual C# Guide
Simple Applications
Sudoku Application
Fractal Explorer
SFML Graphics Guide
Taking C# Further
![]()


Visual C# (Windows) Guide
Working With Bitmaps
Drawing images using GDI+ is quite good fun. There are loads more features to explore like the GraphicsPath class, drawing curves and all sorts of other exciting things. Before we go any further with the drawing, it will be useful to find out how to work with bitmap images. This will ultimately allow us to save anything we generate in our programs.
Working With An Existing File
You need to start by creating a form that looks like the following screenshot,
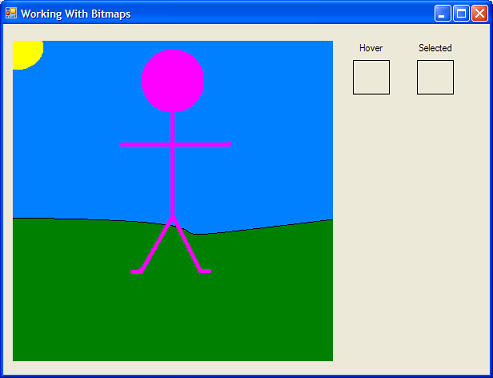
You have a picture box on the left called picBitmap with the following image loaded in,
You choose this by locating the Image property for the picture box. Click the button and click the Import button to load the picture (having saved it using the hyperlink above, dude). The picture is 400 x 400 pixels in size and your picture box needs to be the same.
On the right of the form are two labels, each above a picture box. The picture boxes are called picHover and picSelected and have a FixedSingle border.
We'll start with a function to find the colour of any given pixel in the bitmap we loaded into this picture box. This function reads as follows,
private Color getColourOfPixel(Point pixelLocation)

{

   Bitmap myBmp = new Bitmap(picBitmap.Image);

   Color myColor = myBmp.GetPixel(pixelLocation.X, pixelLocation.Y);

   return myColor;

}
The pixelLocation parameter uses the Point type. This is a handy structure for storing coordinates and has X and Y properties that can be examined - it's easier to pass the single parameter in this case. The first line creates a new instance of the Bitmap class using the image in the picture box as a source. The second line uses the GetPixel method to find the colour of the pixel at that location. The final line returns this Color.
Now to program the picture box events. We need the following two - they are very similar.
private void picBitmap_MouseMove(object sender, MouseEventArgs e)

{

   picHover.BackColor = getColourOfPixel(e.Location);

}


private void picBitmap_MouseClick(object sender, MouseEventArgs e)

{

   picSelected.BackColor = getColourOfPixel(e.Location);

}
Notice that the MouseEventArgs object has a Location property. This is of the Point type that we used as the parameter for our function. Nifty.
Test out the application and jiggle the mouse about on the picture. Click every now and then too.
Changing Pixel Colours In A Bitmap
Add another label and picture box. Call the picture box, picNewColor and fill the label in with the text New Colour. Add a Click event to the picture box and add the following code,
private void picNewColor_Click(object sender, EventArgs e)

{

   ColorDialog cd = new ColorDialog();

   if (cd.ShowDialog() == DialogResult.OK)

   {

      picNewColor.BackColor = cd.Color;

   }

}
This uses the ColorDialog control to allow the user to select the backcolor for the picture box.
Add a button called btnTransformSelected. When the user clicks this button we will transform all pixels of the same colour as the background of the picSelected box into the colour selected in picNewColor. The code is as follows,
private void btnTransformSelected_Click(object sender, EventArgs e)

{

   Bitmap myBmp = new Bitmap(picBitmap.Image);

   for (int y = 0; y < picBitmap.Height; y++)

   {

      for (int x = 0; x < picBitmap.Width; x++)

      {

         if (myBmp.GetPixel(x,y) == picSelected.BackColor)

         {

            myBmp.SetPixel(x, y, picNewColor.BackColor);

         }

      }

   }

   picBitmap.Image = myBmp;

   picBitmap.Refresh();

}
Test out the application. The new feature should allow you to make quite a change.
Saving The Bitmap
Start by adding a button called btnSave. Clicking this button will allow the user to save a bitmap file containing the image in the picture box.
private void btnSave_Click(object sender, EventArgs e)

{

   SaveFileDialog sd = new SaveFileDialog();

   sd.Title = "Save Your Picture";

   sd.Filter = "Windows Bitmap|*.bmp";

   if (sd.ShowDialog() == DialogResult.OK)

   {

      Bitmap myBmp = new Bitmap(picBitmap.Image);

   myBmp.Save(sd.FileName, System.Drawing.Imaging.ImageFormat.Bmp);

   }

}
Having A Go
You can combine the features of the bitmap class with the GDI+ library. To create a graphics object that allows you to draw on a bitmap, use a line of code like the following,
Graphics g = Graphics.FromImage(Bitmap);
Create an application that generates and saves an interesting bitmap.