Visual C# Guide
Simple Applications
Sudoku Application
Fractal Explorer
SFML Graphics Guide
Taking C# Further
![]()


Visual C# (Windows) Guide
Drawing With GDI+
GDI+ stands for Graphics Device Interface +. It is the part of the .NET library that is used for drawing. Fortunately, there are many functions built-in to allow us to work with graphics.
Coordinates
In all aspects of .NET programming, the top left hand corner of the item you are drawing on is (0, 0). X values increase as you move the right, y values increase as you move downwards.
Drawing Test Application
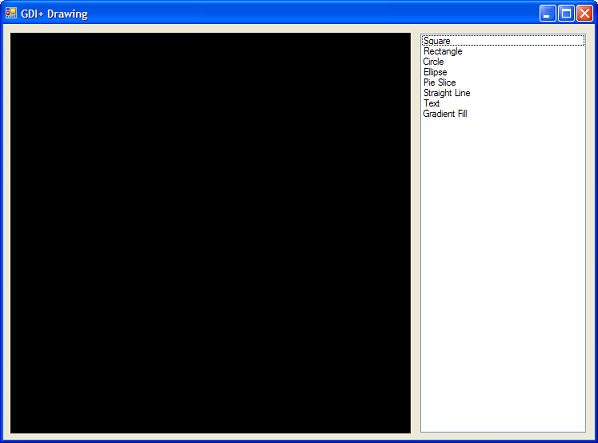
Start by creating a form that looks like the one in the screenshot. On the left of the form is a picture box called picShapes. The control on the right is a list box called lstShapes. The background of the picture box has been set to black. The items entered into the list box were done at design time - you will need to type these things in.
Handling Input
When the user clicks on an item in the list box, we will clear the picture box and draw the selected item. There will be a procedure for each of the operations listed. The following event procedure will be used.
private void lstShapes_SelectedIndexChanged(object sender, EventArgs e)

{

   switch (lstShapes.SelectedIndex)

   {

      case 0:

         DrawSquare();

         break;

      case 1:

         DrawRectangle();

         break;

      case 2:

         DrawCircle();

         break;

      case 3:

         DrawEllipse();

         break;

      case 4:

         DrawPie();

         break;

      case 5:

         DrawLine();

         break;

      case 6:

         DrawText();

         break;

      case 7:

         FillGradient();

         break;

   }

}
Square & Rectangle
All GDI drawing is based on a graphics object drawn from the context in which you want to draw. In this case, we make our graphics object from the picture box where we want to draw.
A square is a rectangle where the sides are all equal - the procedures are very similar.
private void DrawSquare()

{

   picShapes.Refresh();

   Graphics g = picShapes.CreateGraphics();

   Rectangle mySquare = new Rectangle(10, 10, 480, 480);

   g.DrawRectangle(Pens.White, mySquare);

}


private void DrawRectangle()

{

   picShapes.Refresh();

   Graphics g = picShapes.CreateGraphics();

   Rectangle myRect = new Rectangle(10, 10, 480, 280);

   g.DrawRectangle(Pens.White, myRect);

}
Circle & Ellipse
An circle is an ellipse where the height and width is the same. The procedure for circle and ellipse is very similar.
private void DrawCircle()

{

   picShapes.Refresh();

   Graphics g = picShapes.CreateGraphics();

   Rectangle myRect = new Rectangle(10, 10, 480, 480);

   g.DrawEllipse(Pens.White, myRect);

}


private void DrawEllipse()

{

   picShapes.Refresh();

   Graphics g = picShapes.CreateGraphics();

   Rectangle myRect = new Rectangle(10, 10, 480, 280);

   g.DrawEllipse(Pens.White, myRect);

}
Pie
The DrawPie() method allows us to draw a slice of a circle choosing exactly which part of the circle we want to slice. The format for this method is,
DrawPie(Pen, Rectangle, Start Angle, Sweep Angle)
The full procedure looks as follows,
private void DrawPie()

{

   picShapes.Refresh();

   Graphics g = picShapes.CreateGraphics();

   Rectangle myRect = new Rectangle(10, 10, 480, 480);

   g.DrawPie(Pens.White, myRect, 0, 90);

}
Lines
Other than the pen colour, you need 4 pieces of information to draw a line. These are the x and y co-ordinates of the start and end of the line.
private void DrawLine()

{

   picShapes.Refresh();

   Graphics g = picShapes.CreateGraphics();

   g.DrawLine(Pens.White, 10, 10, 400, 400);

}
Drawing Text
private void DrawText()

{

   picShapes.Refresh();

   Graphics g = picShapes.CreateGraphics();

   Font f = new Font(FontFamily.GenericSansSerif, 12, FontStyle.Bold);

   g.DrawString("Writing", f, Brushes.White, new Point(10, 100));

}
Gradient Fill
All of the methods used so far are drawing methods. For each drawing method there is a corresponding Fill method (FillRectangle, FillEllipse etc). When we draw a shape, we use a pen - when we fill a shape, we use a brush. You can specify brush colours in a simlar way to that used to specifiy a pen colour - Brushes.White. You can also make some fancy gradient style brushes too.
The LinearGradientBrush type is available when you add another using statement to the top of the form's code window - using System.Drawing.Drawing2D;.
private void FillGradient()

{

   picShapes.Refresh();

   Graphics g = picShapes.CreateGraphics();

   Rectangle myRect = new Rectangle(10, 10, 480, 280);

   LinearGradientBrush lb = new LinearGradientBrush(myRect, Color.Gold, Color.Silver, LinearGradientMode.Horizontal);

   g.FillRectangle(lb, myRect);

}
Having A Go
- Add procedures to the sample program to fill the shapes that are currently being drawn.
- Add a procedure to the program to draw a smiley face. You may wish to look up the DrawArc method on the MSDN. It is very similar to the DrawPie() method.
- Write code to simulate the workings of a seven segment LCD display for the digits 0-9. The image below shows roughly how this should look. The timer control has a Tick event which fires every time the timer reaches the Interval property that has been set. Use this control to make your digits cycle from 0-9 repeatedly. Look up the timer control in the MSDN library if you need more information.
