MakeCode Arcade
Game Tutorials
![]()


Classic Platformer
Introduction
The aim of this project is to make a basic platform game with the main features that you would expect to see in such a game. I also wanted to work out an easy way to place game elements within a level so as to make level design simpler for games with multiple levels. This game uses a tile map with a mechanism for replacing tiles with sprites.
The game also uses some basic animation which could be extended way beyond the examples shown here.
Character Animation
We're going to have our character animated in this game. This is a very basic version of what you could do if you spent some time reading about how to animate properly.
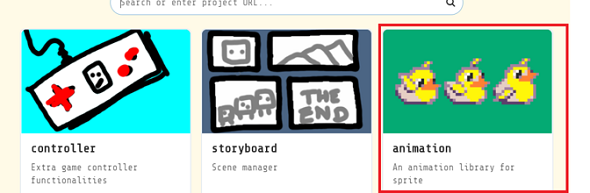
Start by adding the animation extension. Click on the settings menu and choose Extensions. Select the Animation extension.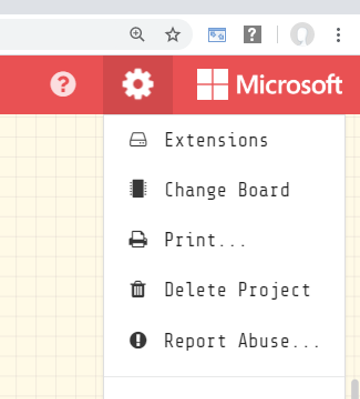
This will add a category to our programming blocks which will allow us to automate the sprite changes that animate our character sprite.
I have used a function to set up all of the drawings for the player character. You can find the blocks for functions by first selecting the Advanced category. The image blocks are also in the advanced category. All of my drawings are 16x16 pixels.
I am using an array to store all of the images of the animation. You can find the blocks for arrays in the Advanced category.
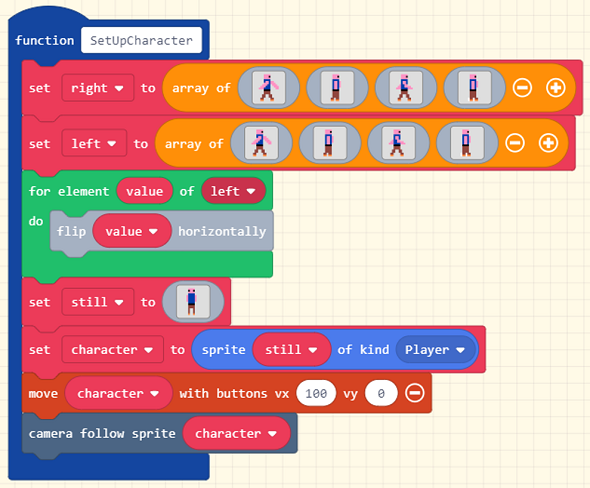
The second array starts off as a straight copy of the first one. The 'for element loop' is used to flip all of the drawings to make them face the other way and save some time.
You can look up 'run cycle animation' to find out how to do a better job than I have with the worm-like character.
The next set of blocks are about swapping the animations around depending on the direction that the character is facing.
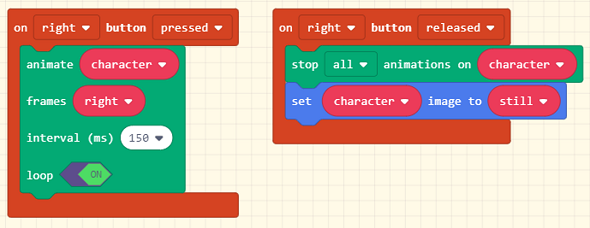
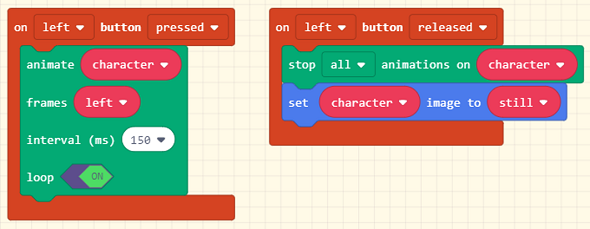
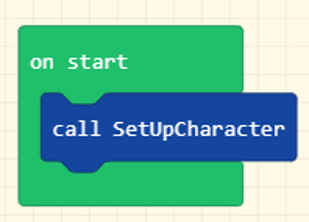
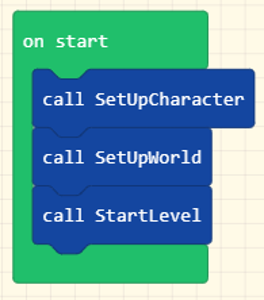
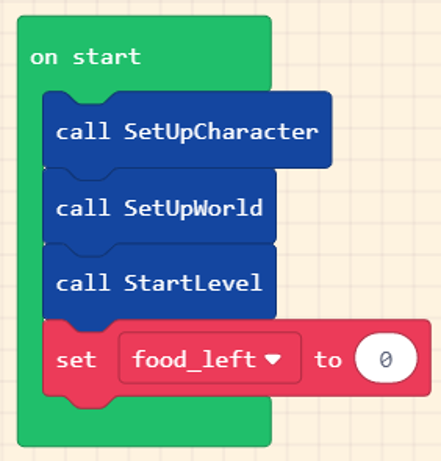
We can finally test our work by calling the function that we designed.
Pressing and releasing the left and right buttons should show us the effect of our animation code. We will be adding to this event - do not try to add more than one On Start - just add blocks to this one.
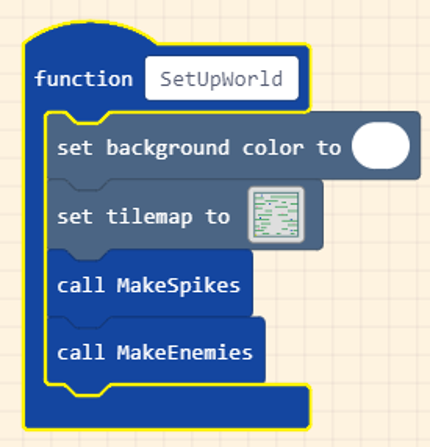
Setting Up A Basic Level
We need to create a basic world to develop our game mechanics. Keep things simple for now and improve on them later.
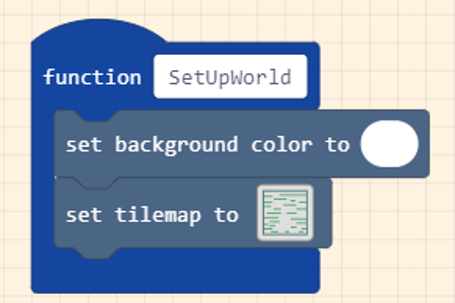
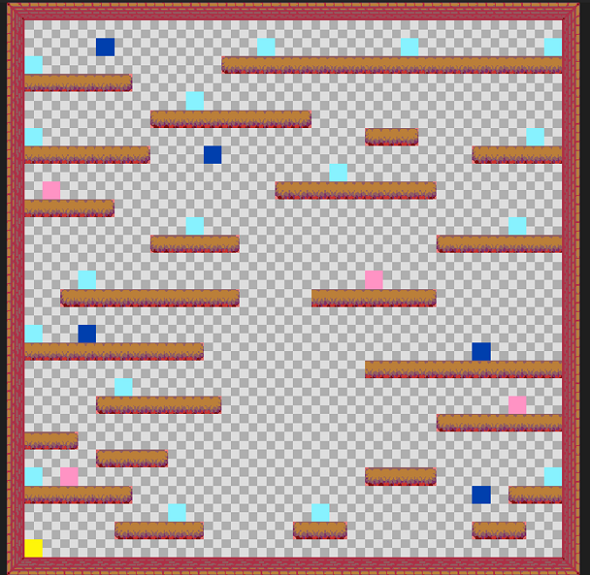
Here is my outline for the tile map. It is drawn on a 32x32 grid.
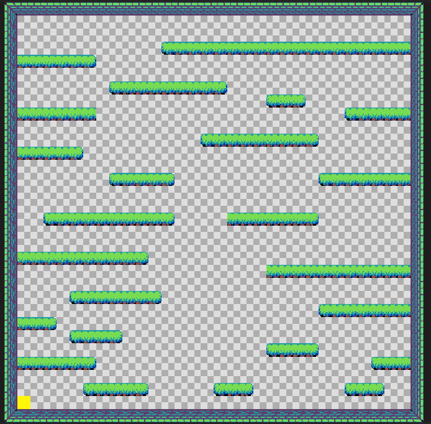
The yellow tile is used to mark where the player will start. We will be removing this. We could specify the location of the player but, since it might be different in future levels, we can use a yellow tile as a marker and remove it in code. You have to mnake the yellow tile yourself by clicking on My Tiles in the tile map editor.
Now we need to place the walls. Everywhere that the character should be able to land on needs to be marked as a wall.
The following function will be called at the start of a level. So far, it places the character on top of the yellow tile. Although it says random, there is only one of them. We know where the character will be. We also have code to replace the yellow tile with a transparent one - which removes the yellow square.

The other setting is the gravity. This is the force of acceleration downwards on the character.
We can test that the level design and character placement work by adding calls to our functions to the On Start that already exists. Don't try to add another one of these events.
You should be able to move left and right without sinking through the floor. You need to be able to jump though. This is relatively simple,
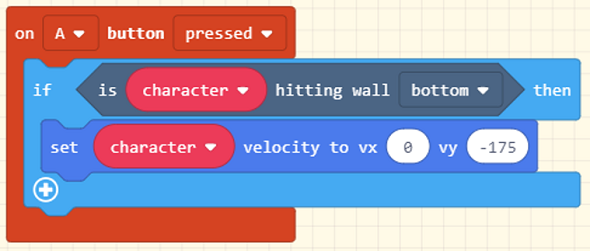
The value we use for vy determines how high our character will be able to jump before the gravity we set brings it down to earth. By changing these two numbers, you can achieve the effect that you want and vary the feeling of the game quite a lot.
You need to check that all areas of your level can be reached and get a feel for the distances that work in the level design. The settings I have used make the jumping quite slow, by increasing both the gravity effect and the jump values, you can speed up the process.
Hazards
In most platform games, there are things that hurt or kill the player. Some of these are static - they don't move around. This would be things like poison rivers, lava pits, spikes and so on.
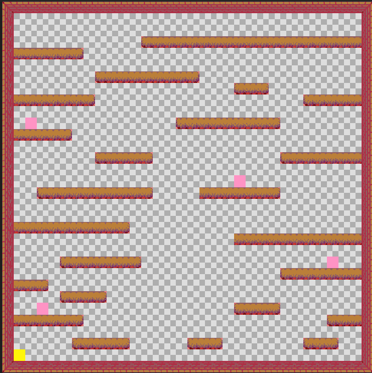
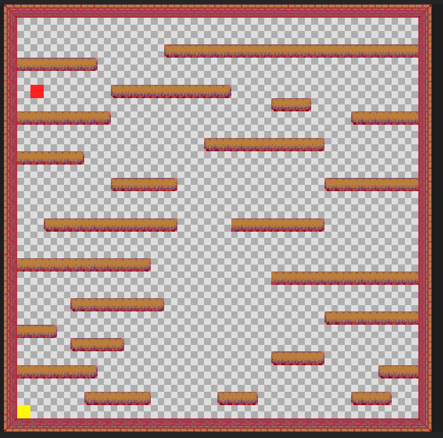
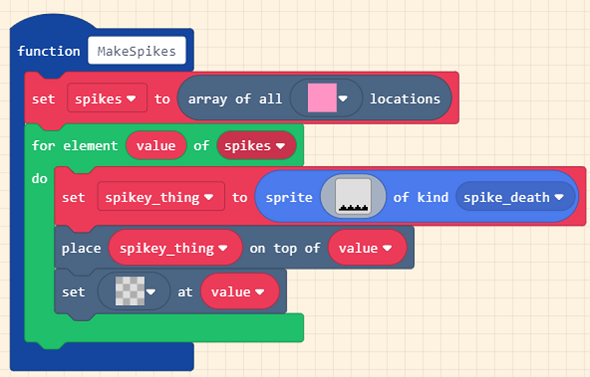
This is the tile map for our level (SetUpWorld function) with some pink square tiles added. This is where we would like to place some spikes.
You can have any number of spikes in the level. You could also replace it with something else that is equally dangerous to our intrepid player. The pink tile isn't going to appear in the game. Like the yellow square, it is just a place holder for where we would like our spikes to be placed.
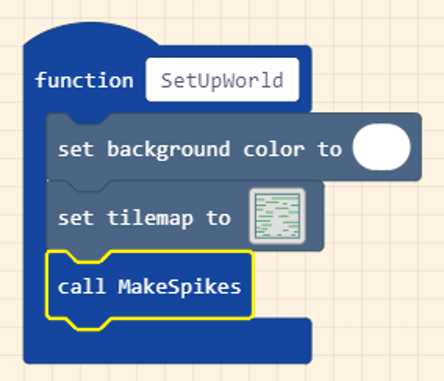
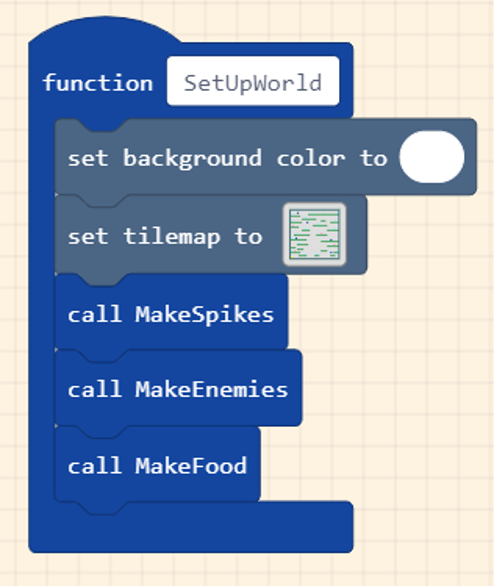
Next, we call this new function from our SetUpWorld function.
The last thing to do is to arrange the death of the player when it makes contact with the spikes of certain doom.

This doesn't have to be the end of the game if you want to operate a health or lives policy when it comes to fire, spikes, poison, or whatever it was that you did instead of spikes.
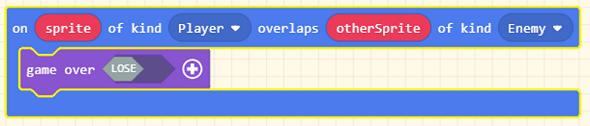
Enemies
Moving enemies break up the timing of the game for the player and give them something that is a little more awkward to avoid.
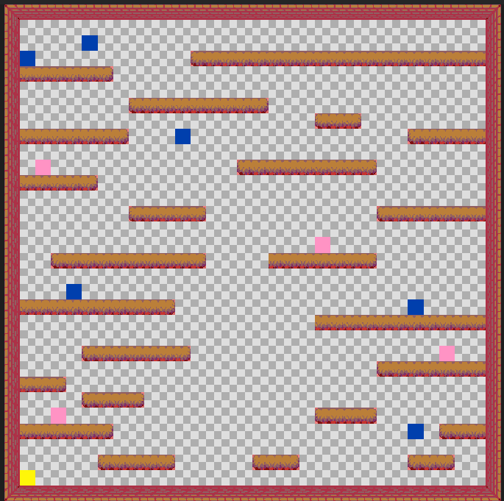
When it comes to designing the level, we can use the exact same approach as we did for the spikes. First, adjust the tile map. I have added some blue tiles.
We need a function to make the enemies appear and define their movements,
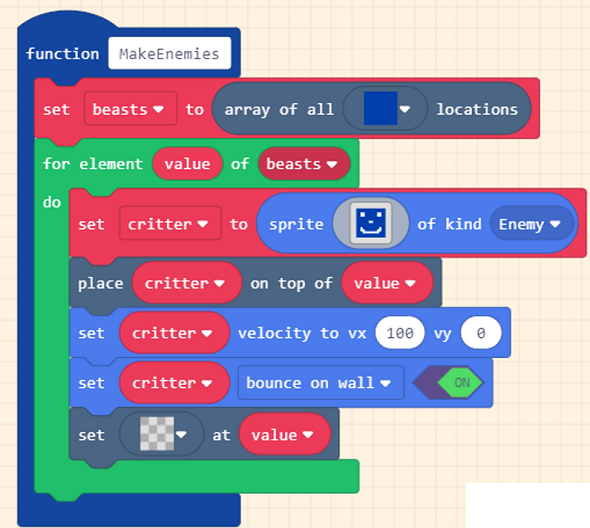
We add a call to the new function in our SetUpWorld function.
Finally, we need the death code.
This would be a good point to consider adding some variety in your death/harm-causing game features before moving on to the food element of the game.
Food
The same approach is going to be used for the food. Place a coloured tile everywhere you want the food to be placed. I have gone with a turquoise tile.
Add a variable assignment to the On Start. We need a way to track the amount of food we have left in our level.
Add a function to make the food items appear in the game.
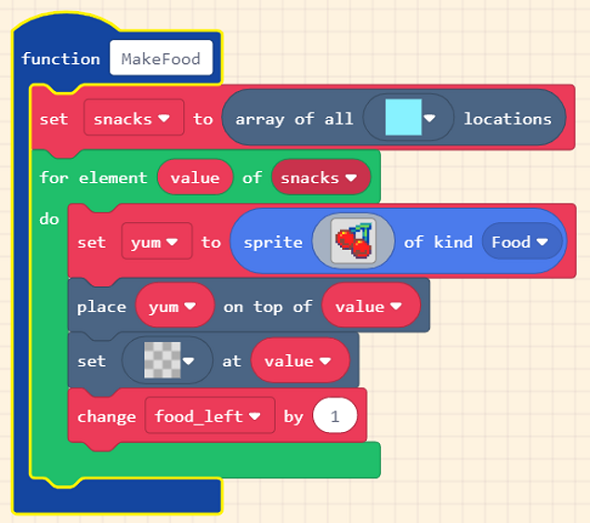
Call the function at the end of your SetUpWorld function,
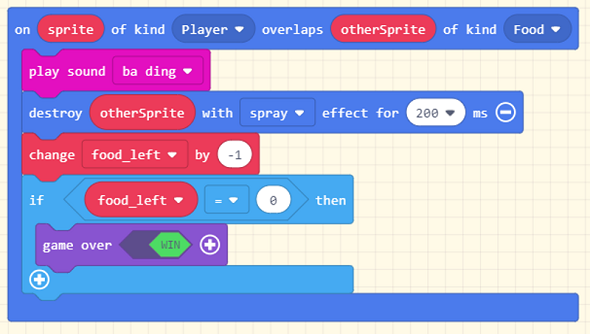
Eat food. Be careful here. The othersprite block is not a normal variable - do not try to create it. Instead, drag it from the function definition line into the place you want to use it.
Challenges & Extensions
- Spend some time working on the graphics. A consistent theme across the whole game, perhaps backed up with something of a story, would make this game sing, as would some sound effects.
- Redo the level design on a much larger tile map. This takes time but gives maximum space for game ideas.
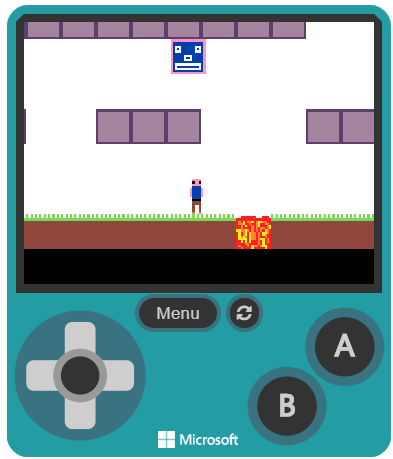
- Add more features, different types of hazard and enemy. In the screenshot at the top, I have a lava pit (very badly drawn).
- A trampoline/springboard is quite easy to make. Make contact with it for the player to perform a giant leap up the screen.
- A teleporter would be a nice feature. You could make some part of the level seem inaccessible until the teleporter is reached.
- Add a wall that can only be removed by finding a key or several parts of a key.
- Additional levels can be made. Look carefully at the way that this guide makes up the level and you should be able to extend the principle to have multiple levels. The tile map is the key and the only difference between the code you need for the different levels. With that, you need a way of moving from one level to the next, knowing when there are no more levels to beat.
- Redo the game with lives instead of instant death. That allows the player to get further into the game.
Thank you to my students for the following ideas,
- You could make a jetpack. When the player picks up the jetpack, remove the sprite from the level. Start a countdown and change the ay setting to 0. Change the vy to a negative number. When the character collides with a wall (by hitting its head), stop the countdown and reset the gravity. When the countdown ends, also reset the gravity.
- You could have a brief period of immunity when you pick up an item. Add a true/false variable to the start of the game and make it false. When you pick up your immunity potion (or whatever it is), start a countdown and set the immunity variable to true. Set it back to false when the countdown ends. Whenever the player collides with an enemy, only process the collision if the immunity variable is equal to false.
- Another idea that students had was to make it so that the character depended on regularly picking up oxygen for its survival. A countdown (to death) was used, with the countdown being reset every time an oxygen tank was picked up.
- On a slightly different tack, one group decided to have a level with an underwater section. They used solid blue tiles for the water parts of their level. In this area, when making contact with the blue wall, the player was able to jump in mid air, unlike they were on land. Repeatedly pressing the up key allowed them to 'swim', letting go caused the character to sink. The effect was pretty good.