Visual Basic 6.0 Guide
Learning Visual Basic 6.0
Example Programs
![]()


Visual Basic 6.0 Guide
Flying Thingies
1. Launch Visual Basic 6.0 using the start menu, and select Standard Exe from the New Project dialog box.
2. The screen should look something like this. This is your program in what is called Design View.
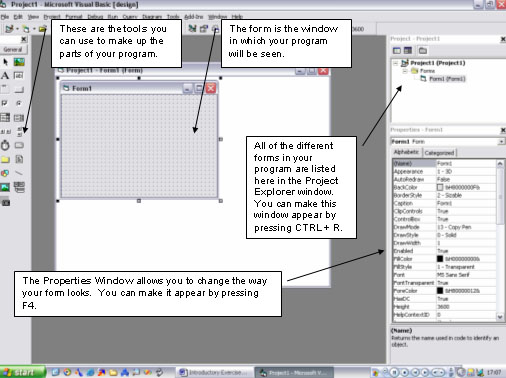
3. We will start by changing some of the properties of this form. Change the following properties in the properties window.
| Change What | To |
|---|---|
| (Name) | frmMain |
| Caption | Flying Thingies |
| Height | 6000 |
| Width | 6000 |
4. We are going to change the name of the project. Click on Project, Project1 Properties and set the project name to MovingThingies.
5. Save the work in a new folder in your user space. Call the folder thingies.
6. Click on the image tool then drag a small square in the centre of your form. You should now see a small dotted square in the centre of the form. This is the container for the image we will use. Change the name of the image to imgThingy.
7. Select the picture property in the Properties Window. You need to choose a small picture to fly around the form.
8. Click on the timer tool in the toolbox (it looks like a stopwatch). Drag a square anywhere on your form. Change the name of the timer to tmrMove and set the interval property to 100.
9. Double click on the stopwatch. This should cause a code window to pop-up. The cursor should be blinking away like a good 'un in between the following lines of code.
Private Sub tmrMove_Timer()


End Sub
The code we write in between these lines will be executed (run) after every 100 milliseconds (the interval that we set for our timer). The code is called an event handler. Every 100 milliseconds, the timer fires an event and runs any code you have entered into this window.
10. Enter the following line of code between the two lines provided.
imgThingy.top = imgThingy.top - 50
This line of code will change the Top property of your image (how far it is from the top of the window) every time the timer fires its event, making the image move up the window.
11. Save your work. Click on F5 to run your program. Your picture should move up the window until it eventually disappears into the top of the form. This will never do! Close the window to stop your program from running so that we can fix this problem.
12. Go back to the code. Change it to look like this
Private Sub tmrMove_Timer()

imgThingy.Top = imgThingy.Top - 50

If imgThingy.Top <= 0 Then

imgThingy.Top = frmMain.ScaleHeight

End If

End Sub
The if statement checks to see if the image has reached the top of the form (the value for its Top property has reached 0). If it has, we change the value for the Top property to be the height of the interior of the form. Save your work and run the program again. Show modest excitement at the results. Close the window again so you can move on.
13. We can refine the program by making the flying speed adjustable by the user. Click on the Horizontal Scrollbar tool in the tool box. It is cunningly disguised as a horizontal scrollbar. Drag another square to place a scrollbar somewhere outside of the flight path of your thingy. Change its Max property to 100 and its Min property to 10. Change its value to 50. Change your code to look like this.
Private Sub tmrMove_Timer()

imgThingy.Top = imgThingy.Top - HScroll1.Value

If imgThingy.Top <= 0 Then

imgThingy.Top = frmMain.ScaleHeight

End If

End Sub
Run the program, delight in the adjustability of the flying speed.
14. Go back to design mode and click on the label tool in the tool box (it's a capital A). Drag a rectangle to create a label box on the end of the scrollbar. Change the Caption property of the label box to show whether this is the direction for faster or slower. Repeat the process to place labels at both ends of the scrollbar. Save and test.
15. Now it's time to make this into your own program. If you add another image, which you name imgThingy2, you could make this one fly across, rather than up the screen. You would need to add some code after the End If statement to make it move. It would be the same as above except that you write imgThingy2 instead of imgThingy. You also replace the word Top with the word Left to get the program to adjust the distance your image is from the left of the screen. You would also want to make sure that the image came back through the right hand side of the form after disappearing left. You would do this by setting its Left property to the frmMain.ScaleWidth.
16. Hmm! Can you make images that go diagonally? Can you move images in the opposite direction (downwards rather than upwards)? How could you jazz up your program even more, any ideas?