Visual Basic Guide
Simpler Applications
Fractal Explorer
Conway's Game Of Life
![]()


Visual Basic 2010 (Windows) Guide
Flying Thingies
Introduction
This is a very silly application that you can use to quickly get use to some of the basic things to get a forms-based program going in Visual Basic 2010.
Step 1
Launch Visual Basic 2010 from the Start menu and choose File, New Project from the main menu. Choose to make a new Windows Application and select a project name of Flying Thingies.
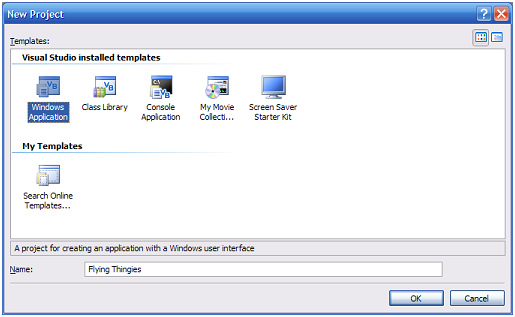
Press OK to make the project.
Your project is made up of more than one file - in fact there a lot of files and folders that will need to be saved. You will need to take care with this.
Step 2
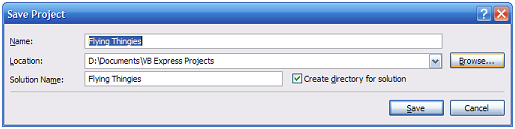
To save your project, click on File, Save All on the menu. You should get a box like this.
Step 3
Now you are ready to start making your first program. In the centre of the screen, you should be able to see the form that was automatically created for your program. If you can't, double click on form1.vb in the Solution Explorer window. This form is the window that your program will run in. The first thing to change is the text in the form's title bar. Look in the properties window and scroll down until you find the property called text. Change it so that it says Flying Thingies and press enter. Your text should now appear in the title bar of the form.
Step 4
Resize the form by dragging with the mouse. You will need your form to be at least half as large as the screen you are working with.
Step 5
Look through the toolbox on the left of the screen until you find Picture Box. Click on this and draw a small picture box (about 75 pixels square) in the centre of the form. In the properties window, change the name of the picture box to picThingy and the SizeMode to Autosize.
Step 6
You need to find a small image to place in the picture box. If you have no smallish pictures saved already, find one on the web and download it to your user space. Now find the image property in the Properties Window. Press the button and you will see the following dialog box,
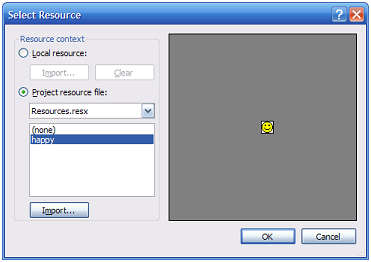
Select to import a resource and choose an appropriate image for the picture box. Click OK and see how you have placed your picture on the form.
Step 7
Now to animate the picture. Locate and select a timer control from the toolbox. Click on the form to add a timer. Change the name of the timer to tmrMove and set its interval to 10 and make sure that its enabled property is set to true and the GenerateMember property is also set to true.
Step 8
Double click on the timer icon that is below your form. The code window for your form should pop up with the cursor placed between the following lines of code,
Private Sub tmrMove_Tick(sender As System.Object, e As System.EventArgs) Handles tmrMove.Tick


End Sub
Add the following line of code in between these lines.
picThingy.Top = picThingy.Top - 1
Each time that the timer ticks, this line of code subtracts 1 pixel from the picture's top property. The top property is the distance in pixels that an object is from the top of the form.
Step 9
Now to test the program for the first time. Press F5 to start the debugger. The picture should glide gracefully up the screen and disappear at the top of the form. We should sort this out.
Step 10
Stop the program by closing its window. Change the code that you wrote to that shown below. The following lines of code check the position of the picture and, if the top property is less than 0 (above the top of the form), the top property to be equal to the height of the form. Notice that the word Me is used to refer to the form.
Private Sub tmrMove_Tick(ByVal sender As System.Object, ByVal e As System.EventArgs) Handles tmrMove.Tick

   picThingy.Top = picThingy.Top - 1

   If picThingy.Top < 0 Then

      picThingy.Top = Me.Height

   End If

End Sub
Run the program again and enjoy the way that your picture flies off the top of the form and comes back at the bottom.
Step 11
Now we are going to add some more controls to the form to make the movement of the image adjustable. Look through the controls in the toolbox and locate the HScrollbar control. Click and draw a scrollbar on the form. Name your scrollbar hscAdjust. Also set the following properties to these values,
- Minimum - 1
- Maximum - 100
- Value - 10
Step 12
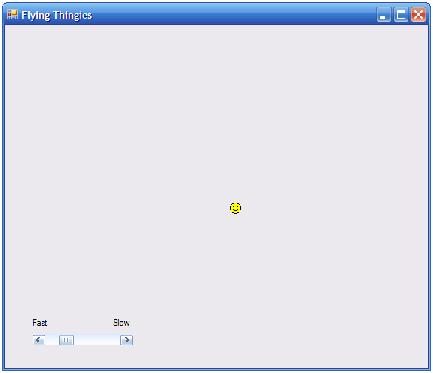
Add a label to the left of the scrollbar. Change its text property to Fast. Add another label to the right of the scrollbar and change its text property to Slow. Your form should now look something like this,
Step 13
When the user adjusts the scrollbar, we want to change the interval property of the timer accordingly. To do this, double click on the scrollbar that you placed on the form. The code window should pop up with the cursor in between the following lines of code,
Private Sub hscAdjust_Scroll(ByVal sender As System.Object, ByVal e As System.Windows.Forms.ScrollEventArgs) Handles hscAdjust.Scroll


End Sub
Add the following line in between those 2 lines,
tmrMove.interval = hscAdjust.Value
Save your work and run the program again. Monkey about with the scrollbar and delight in the adjustability of your program.
Review & Enhance Your Work
You have now completed a very basic program. Remind yourself of what you have learned and read through the code that you wrote. Now to consider some additions to the program.
Add More Thingies
You could add another picture box to the form with a different picture. It will need a different name like picThingy2. You will also need to add some lines of code to make sure that this new picture is also moved when the timer ticks.
Move Down The Form
To make a picture fly down the form, you need your code to add 1 (instead of subtracting) to the picture's top property each time the timer fires. The following lines of code, added to the other code you wrote, would make a picture called picThingy2 fly down the screen and reappear at the top when it goes off the bottom of the form,
Private Sub tmrMove_Tick(ByVal sender As System.Object, ByVal e As System.EventArgs) Handles tmrMove.Tick

   picThingy2.Top = picThingy2.Top + 1

   If picThingy2.Top > Me.Height Then

      picThingy2.Top = 0

   End If

End Sub
Move Across the Form
Your pictures have been flying up or down the form because we have been adjusting the top property of the picture. Controls also have a left property that indicates the distance that the control is from the left of the form. If you add another picture and write code that adds or subtracts 1 from this property each time the timer ticks, your picture will move horizontally. If you subtract from this property, it will eventually become equal to 0. If it is less than zero, you will have to make it equal to the width of the form if you want it to reappear at the right of the form when it flies off the left.
Move Diagonally
To move diagonally, you need to adjust the top and left of the picture. Try it.