Visual Basic Guide
Simpler Applications
Fractal Explorer
Conway's Game Of Life
![]()


Visual Basic 2010 (Windows) Guide
Calculator
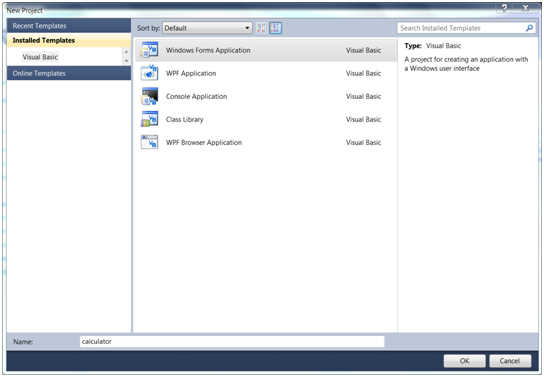
Step 1
Launch Visual Basic and create a new Windows Forms Application called Calculator.
Save your work in your user space. From now on you can just click the Save All button to ensure you have saved your work.
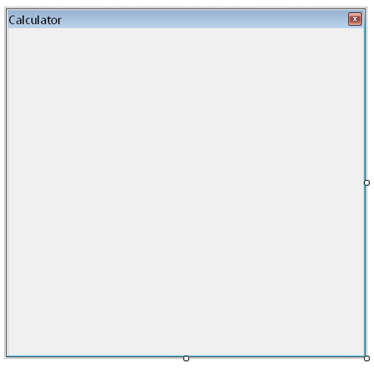
Step 2
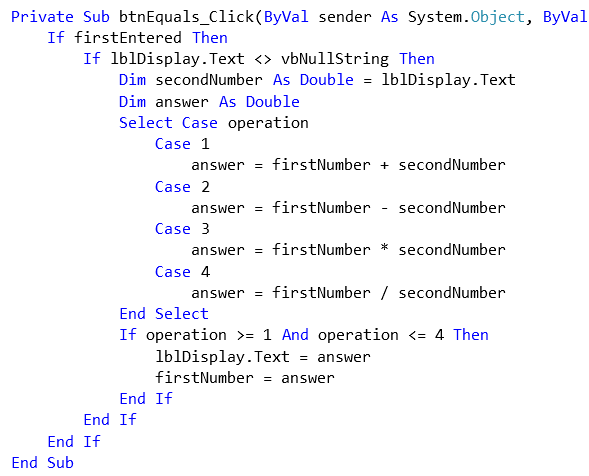
Change a few properties on the form to make it look more like a calculator program - change the Text to Calculator and change the FormBorderStyle to FixedToolWindow.
Step 3
A quick sketch helps us think about the features we should see in a calculator program - we'll start with the simplest things.
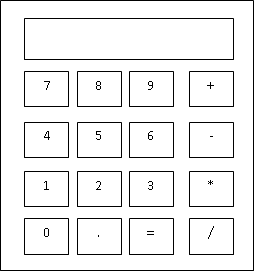
Most of the things in the sketch are buttons. There is a button for each of the digits from 0-9, one for the decimal point, one for equals and a button for each of the arithmetical operations (+-*/) that we want to do.
The large box at the top is to display the numbers we enter and the answer to any calculations we make. The user can't enter text directly in here so the best thing for us to use is a label.
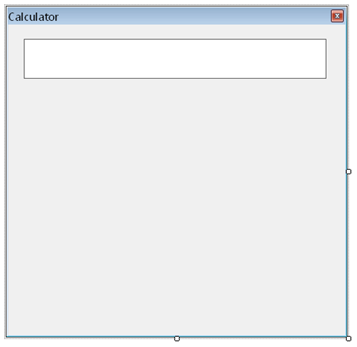
Step 4
Now to make these things on the form. Start with the label. Notice when you first make it, however large you try to make it, it will shrink to the size it needs to be to display the text Label1. Don't worry, we can fix that. Change the name to lblDisplay.
Start by looking in the properties window and choosing a font and size you like. Then look for the property called Autosize. Set it to False.
You will also need to add a border to the label, set its background colour to white, remove the text and make the text right aligned. You should be able to do this by looking in the properties window when you have the label selected on the form.
Step 5
Our next job is to add the number buttons. Start by adding one of the number buttons, say the 7 button. Change its name to btnSeven and its text to 7. Change the font, size and colour until you are happy.
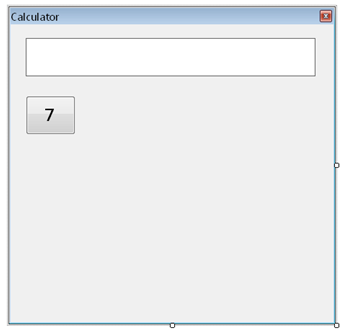
Step 6
Copy and paste your 7 button until you have buttons for all of the digits 0-9. Don't forget to sort out their names and text. Then you should have something like this,
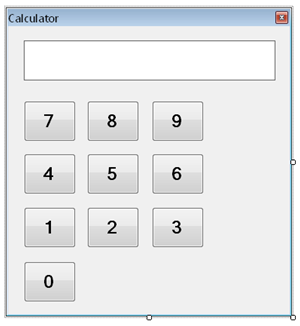
At this point you have a sense of how large the form needs to be and can tidy up the size. It makes quite a difference to how easy your application will be to use if you lay the buttons out neatly as you see in the screenshot.
Step 7
We need to make the buttons work now. Clicking on a button will add the number that is on the button into the display.
Start by selecting all of your buttons - you can do this by drawing a selection rectangle around them all. Now look over in the properties window. We want to look at events - so click on the lightning symbol. Look for the event named click and double click in the empty box to the right of it.

A code window should appear with something like you see in the screenshot. The cursor will be blinking away in the place we are going to need to write our code.
We need one line of code,
lblDisplay.Text = lblDisplay.Text + sender.Text
Save and test your program to make sure that all of the buttons behave as they should.
Step 8
Calculators can't work with super huge numbers and ours will be no exception. It would be sensible to limit the number of digits that can be entered to say, 10.
We can do this by adding an IF statement to the code we have just written.
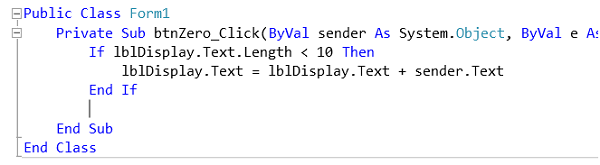
Save and test that there is now a limit on the number of digits that can be entered.
For now, we have finished with the code we need for the digit buttons. We can hide this by clicking on the minus sign to the left of the procedure name.
Step 9
Now we need to add the buttons to do the arithmetic. Copy and paste one of your digit buttons and add four buttons to the form. Name them,
- btnAdd
- btnSubtract
- btnMultiply
- btnDivide
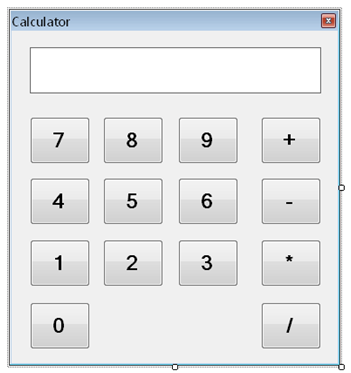
Make sure you sort out the Text so that your buttons look like the ones in the screenshot.
Step 10
We are going to have to declare some variables on the form to make our calculator work like a standard calculator.
When the user clicks on one of the arithmetic buttons we will need to store which one they have pressed, we will store a whole number to represent this with the numbers being,
- 1 - Add
- 2- Subtract
- 3 - Multiply
- 4 - Divide
We will also need to store the number that was in the display when they clicked a button. It's normal for the display to be cleared ready for the second button. This number will be a double in case the user entered a decimal.
Finally, we need to store the fact that a first number has been entered. This lets us know that we should do a calculation when the equals button is clicked. This will be a true/false value so we will use a Boolean variable.
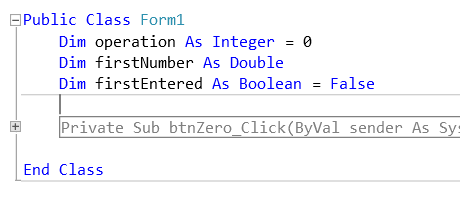
Go to the Code window by clicking View, Code on the menu and enter the declarations you see below.
Step 11
Go back to the form design and double click on the Add button.
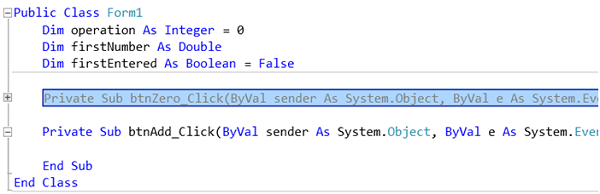
The code window appears with the cursor blinking in the place we need to type.
We have to program the following things,
- Check that there is a number in the display.
- Store that number.
- Store the fact that a number was entered.
- Set the operation to 1 (our code for Add).
- Clear the display.
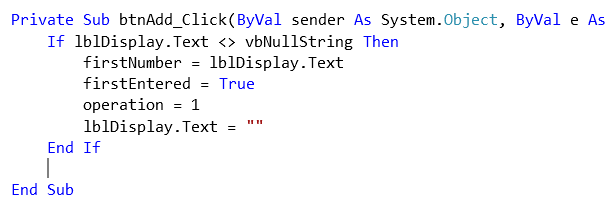
Study the code carefully. The IF statement checks that the label is not empty. The remaining statements perform the tasks listed in the bullets.
Repeat this process for the other 3 buttons, remembering to change the operation to 2, 3 and 4 for the different arithmetical operations.
Save and test that the display is cleared when you enter a number and click on one of the arithmetic buttons.
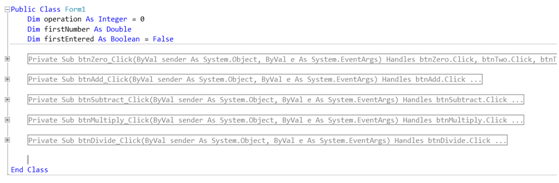
You will have a fair amount of code in the code window by this time, collapse each of the event handling subroutines by clicking on the - sign like before. This makes your code window a lot tidier,
Step 12
The next job for the calculator is to add and program an equals button. Start by adding the button to the form, naming it btnEquals and setting its text to =.
Step 13
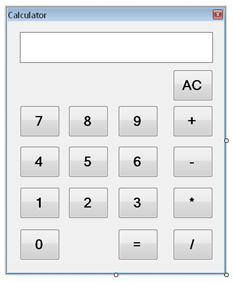
Double click on the equals button to bring up the code window and a place to write the code that is executed when the button is clicked.
The following pseudocode describes what we will be doing here,
IF firstpartEntered = true Then

   IF display isn't empty Then

      Declare secondNumber

      Set secondNumber to text in display

      Declare answer

      Select Case operation

         Case 1

            answer = firstNumber + secondNumber

         Case 2

            answer = firstNumber - secondNumber

         Case 3

            answer = firstNumber * secondNumber

         Case 4

            answer = firstNumber * secondNumber

      End Select

      If operation is 1 to 4 Then

         Put answer in display

         firstNumber = answer

      End If

   End If

End If
The actual code for this is,
Save and test your program. You nearly have a functioning calculator. When you get the answer to a calculation, it becomes the new firstNumber and you can do more arithmetic with it.
Because you might not want this, we need an AC or All Clear button.
Step 14
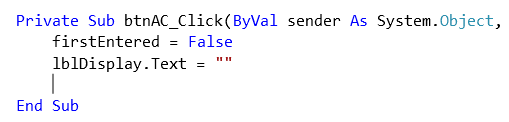
Make space on your form for an AC button. Call it btnAC and change its text.
Step 15
Double click on your new button to add the code to clear the display and the firstNumber. The code you will need is shown below,
Step 16
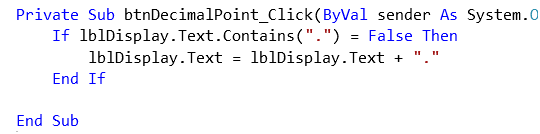
The last of the basic features is the decimal point. This isn't quite as simple as adding a digit because we can only have one decimal point in our display.
Add the button you will need. Name it btnDecimalPoint and change its text to a decimal point. Double click on the button to bring up the code window and add the code you see below,
Save and test your completed calculator.
Extending Your Calculator
Clear Button
Your calculator should already have an All Clear button. A Clear button is used when you want to re-enter your second number. It just empties the display. You don't have to change the value stored by firstEntered to do this, just set the display to "".
Delete or Backspace Button
If you have entered a 10 digit number and made a mistake with the last digit, rather than clear the display and enter the first 9 digits over again, it would be good to be able to remove the last digit.
Firstly, you need to check that the display has one or more characters. For this you need to know its length,
lblDisplay.Text.Length
If it has one or more characters, you can set a String variable to be equal to what is currently in the display or lblDisplay.Text.
You can declare another string to store the text you want to put in the display as a replacement.
You need to know how many characters will be in the new text. If the display currently has one character, you just need to clear it. If there are more, you need to use the SubString property,
newtext = oldtext.Substring(0, newlength)
Obviously you replace newtext and oldtext with the variables you have used. newlength is the length of oldtext - 1.
An x2 Button
On a normal calculator, this kind of button squares whatever is in the display whether it is the first or second part of a calculation.
If it is the first part of a calculation (ie firstEntered = false), you should set firstEntered to true and store the display in firstNumber.
A similar process can be followed for x3 and for a square root button.
MS, M+, M-, MR, MC Buttons
These buttons are found on most calculators,
- MS = store display in memory
- M+ = add display to what is stored in memory
- M- = subtract display from what is stored in memory
- MR = put whatever is in memory into display
- MC = clear the memory
You will need to add another variable to the top section of the code window,
Dim operation As Integer = 0

Dim firstNumber As Double

Dim firstEntered As Boolean = False

Dim memory As Double = 0
The last one is the one you need to add, the others should already be there. None of these buttons change any of the firstNumber/secondNumber parts of calculations.
A Mod Button
The Modulus is the remainder when two numbers are divided. You would need to add another operation like your +-*/ and edit the code for the equals button.
The operator for Modulus in Visual Basic is Mod.
A PI Button
All a PI button does on a calculator is to put a value for PI in the display. In Visual Basic, the constant Math.PI represents the value of PI.
Copy & Paste
When something is copied, it is stored in the Clipboard. These are the VB features you will need to look up. This is quite a useful feature on a Windows calculator where you may want to put the result of a calculation into a document without having to retype it.
More Stuff
This Multiwingspan page has some Math functions you may wish to use,