Twisting Puzzles
Puzzle Menus
![]()

Twisting Puzzles
Square-1 Solution
Introduction
There are lots of approaches to solving the Square 1. All the solutions that I have seen start by restoring the puzzle to a cube shape. After that, there are many choices. This page describes a simple method with only essential algorithms or ones which are as easy to remember as a Square-1 algorithm can be. The algorithms have been found on a number of sources and are duplicated across many. The notation used is also used on two excellent pages on the Square-1. Those pages are,
Jaap's page describes 4 methods in some detail. It also has an extensive guide to a variety of strategies for restoring the cube shape. Jaap also has an optimal solver for the Square-1 should you wish to find your own way. Lars Vandenbergh held the record for solving this puzzle on and off for a few years. Both solutions are very detailed and well worth a look.
Notation
Turns of the puzzle are described as follows,
(a,b) /
In the algorithms, a will be a number from -6 to 6. A value of 1 for a would mean that you turn the top layer 30° clockwise. The letter b is used to describe how you turn the bottom layer. The same system is used. The edges make a 30° angle at the point of the triangle that connects to the centre. The corners make a 60° angle. If you count 1 for an edge and 2 for a corner, however they are laid out, you can work out what is meant. The forward slash (/) means that you turn over the right hand half of the puzzle. It's the equivalent of R2 on a cube.
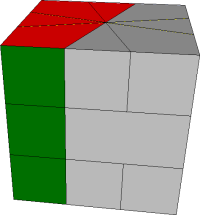
It also matters how you hold the puzzle. The puzzle should be placed so that the middle piece to the left of the join is a thin piece. The pieces you turn over are shown in grey in the image below,
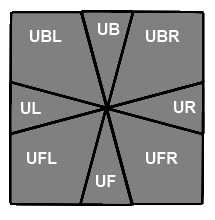
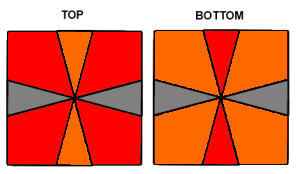
You will also find pieces identified using a combination of their face letters. The letters are the same as they are for the cube and, for the top layer, are shown in the following image,
Step 1 - Restore The Cube Shape
The trickiest bit of all comes first. You need to return the puzzle to a cube state (without worrying about if the pieces are in their places). You can probably do this by yourself if you concentrate. There are a few tips to help you though. The approach I like is to gather all of the edges on the top layer and place only corners on the bottom layer. There are 5 cases and the easiest one is where you have all of the edges next to each other on the top layer After a while, you can do this intuitively and quite quickly. A good video about how to pair edges is at You Tube Video - it also explains a few other things.
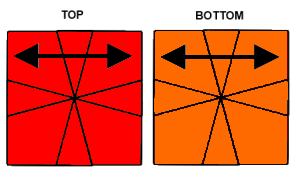
If you get all of the edges on the top layer, your bottom layer will be in this shape,
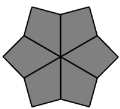
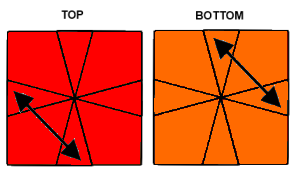
The top layer will be one of the shapes in the table. Rotate the top layer so that the shape you have matches one of those from the table. If you put all of your edges together, you will have the first case.
| Case | Diagram | Algorithm |
|---|---|---|
| 1 | 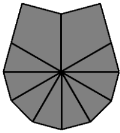 | /(-2,-4)/(-1,-2)/(-3,-3)/ |
| 2 | 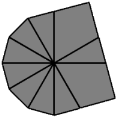 | /(2,-2)/(-3,-4)/(4,-3)/(-5,-4)/(6,-3)/ |
| 3 | 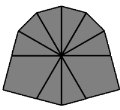 | /(-4,-2)/(-1,4)/(-3,0)/ |
| 4 | 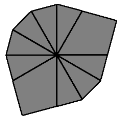 | /(-4,0)/(5,4)/(2,-3)/(-5,-4)/(6,-3)/ |
| 5 | 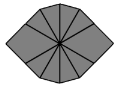 | /(2,2)/(0,-1)/(3,3)/ |
Step 2 - Put Pieces Into Their Layers
Start by putting the corners into the top or bottom layers. Don't worry about the position of them at this stage. If you do (1,0) or (-1,0), turn the cube over, then turn the top or bottom layers,you can swap the corners around without messing up the cube shape.
Once you have that, you then need to do the same for the edges. The following two algorithms are more than enough to complete this step. You can find more on the sites listed at the top.
| Swap UB-DF | Swap UF/UB - DF/DB |
|---|---|
 |  |
| (0,-1) / (-3,0) / (4,1) / (-4,-1) / (3,0) / | (1,0) / (-1,-1) / |
Step 3 - Permute Corners
The following algorithm swaps the back corners of both layers. You can solve all cases by using this a few times.
(1,0) / (3,0) / (3,3) / (3,0) /
Step 4 - Permute Edges
The first two cases are enough to solve everything except parity (the last case is a single edge swap).
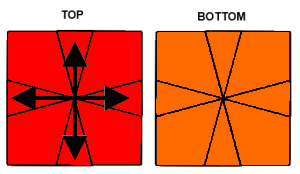
| Swap UF-UB & DF-DB | Swap UF-UL & DF-DR |
|---|---|
 |  |
| (1,0) / (-1,-1) / (6,0) / (1,1) / | (0,-1) / (-3,0) / (1,1) / (2,-1) / |
| Swap UF-UB & UR-UL | Swap UF-UB |
|---|---|
 | 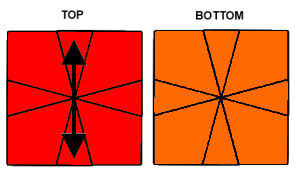 |
| / (3,-3) / (3,-3) / (0,1) / (-3,3) / (-3,3) / (-1,0) | (3,0)/(3,3)/(-1,0)/(2,-4)/(4,-2)/ (0,-2)/(-4,2)/(1,-5)/(3,0)/(3,3)/ |
Although not essential to the process, I usually find edge 3-cycles to be essential when that is the last stage of a puzzle. The 3 cycles for this puzzle are relatively easy to remember too, If you need to do them on the bottom layer, you can use the swap layers algorithm at the bottom of the page to bring the bottom to the top.
| UR-UL-UB (cw) | / (3,0) / (1,0) / (0,-3) / (-1,0) / (-3,0) / (1,0) / (0,3) / (-1,0) |
| UR-UB-UL (ccw) | (1,0) / (0,-3) / (-1,0) / (3,0) / (1,0) / (0,3) / (-1,0) / (-3,0) / |
Step 5 - Deal With The Middle Layer
At the end, you may need the following algorithms.
| Swap The Top & Bottom Layers | (1,0) / (6,6) / (-1,0) |
| Flip A Midde Layer Piece | / (6,0) / (6,0) / (6,0) |