Twisting Puzzles
Puzzle Menus
![]()

Twisting Puzzles
Rubik's Cube (3x3x3) - Corners-First Simple Solution
Notation
The letters represent clockwise rotations of one of the cube faces. If you need to turn the face anticlockwise, there will be an apostrophe after the letter.
For example, R U' R' means rotate the right face 90° clockwise, rotate the upper face 90° anticlockwise, rotate the right face 90° anti-clockwise.
The following slice move will also form part of this method. The letter E is used to refer to the equator, coloured blue in the image below,
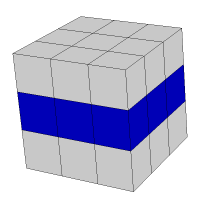
You turn this in the same direction as the D layer - so E means turn it to the right, E' means turn it to the left.
Step 1 - Solve The Top Corners
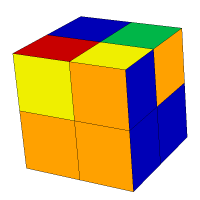
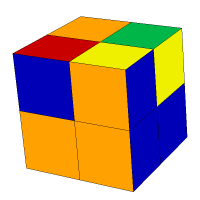
Your first job is to solve the corners on the top face. Front and back views are shown below. You shouldn't need any algorithms to do this.

Then move on to the next stage.
Step 2 - Orient Bottom Corners
The next step is shown on pocket cubes. Since we are only working with corners, the solution is the same.
Turn the cube over so that you can see the bottom face (yellow on my cube).
Rotate the cube with the bottom face up until you have an incorrectly oriented corner as the top left corner of the cube as it faces you.
Use one of the following moves to correctly orient the corner depending on which of the positions the corner is currently in.
| Yellow Sticker Front | Yellow Sticker Left |
|---|---|
 |  |
| D L D' L' D L D' L' | L D L' D' L D L' D' |
Once the corner is correctly oriented, rotate the U face until the next incorrectly oriented corner takes the position of the one that you have just oriented. Do the sequence of moves that is required and continue until all corners are correctly oriented.
If you do this correctly, you will not lose the layer that you started with although it looks like it when you are doing the moves. Start again if you make a mistake. It's easy to make a mistake with this until you get used to doing it from memory.
Step 3 - Permute Bottom Corners
Hold the cube with so that the two solved corners as the bottom right corners of the whole cube.
The horizontal shift algorithm is,
R' D L D' R D2 L' D L D2 L'
If you can't find a pair like the ones above, you have this scenario. The diagonal shift algorithm is,
F2 D' L D' L' D F2 D L D L'
Step 4 - Solve Top Layer Middle Edges
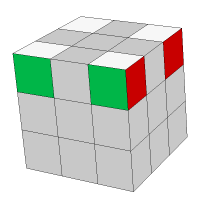
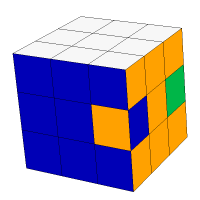
Move the middle edges of the top layer into place. Moving middle edges doesn't affect the corners at all. In fact just do three of them and the centre square as well while you're at it. End this stage with the cube as shown below, top layer solved except for a 'hole' and the bottom corners correctly positioned from the last stage.
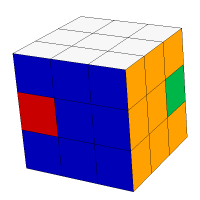
Step 5 - Solve Bottom Layer Middle Edges
In the image below, the blue middle edge from the bottom face is on the right face of the cube.

To place this piece, you do the following move,
F' E' F
If the piece were the other way around, so that the yellow side of the edge is on the right face, you do a similar sequence,
F E2 F'
It won't take too long for you to get used to this. One of the benefits of the corners-first method is that you can place the top and bottom layer edges intuitively or with the simplest of algorithms.
Fill The Gap
By this stage you should have the bottom layer solved and the top layer a middle edge away from solving. Twist the middle layer so that the white edge comes into view. It may be on the left like you see below,

F E F' E2 F E' F
If the last white edge is on the right, go for,
F' E F E F' E2 F
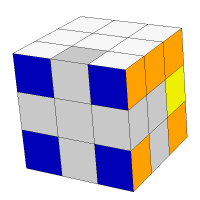
Step 6 - Permute Middle Layer Edges
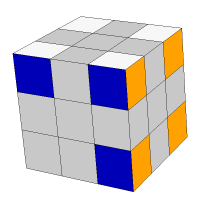
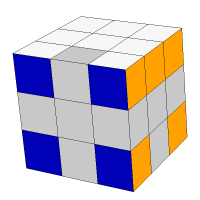
Line up the centre squares of the middle layer. In this stage, you position the middle layer edges. Don't worry about orientation, you deal with that right at the end. To understand the diagrams, imagine that you are looking down on the cube and can see through the top layer. Only the edges are shown - no centres.
| Back-Front Double Swap | Clockwise 3-Cycle | Anti-Clockwise 3-Cycle |
|---|---|---|
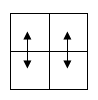 | 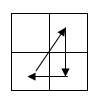 | 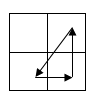 |
| R2 E2 R2 E2 | E R2 E' R2 | R2 E R2 E' |
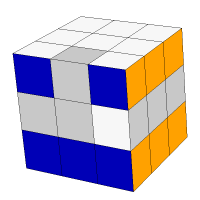
Step 7 - Untwist Middle Edges
The last thing to do is to sort out twisted edges that are in the right place but the wrong way around. You can have 0, 2 or 4 twisted edges at this stage.
We untwist the edges, two at a time by holding the cube as you see in the image and doing the sequence shown below.
E R' E R' E R2 E' R' E' R' E' R2
Sometimes the edges we want to untwist are diagonally opposite as seen in the image.
In this case, do F2 before doing the sequence and then do F2 afterwards.
If you had 4 twisted edges, you can do the algorithm twice.
About This Method
The only disadvantage in this method is that slice moves are harder to do finger tricks with than face turns. That places a bit of a limit on speed. The main advantages of this approach is that it is simple to remember and scales up across all of the larger cubes.