Twisting Puzzles
Puzzle Menus
![]()

Twisting Puzzles
Rubik's Cube (3x3x3) - Layer-By-Layer Simple Solution
Notation
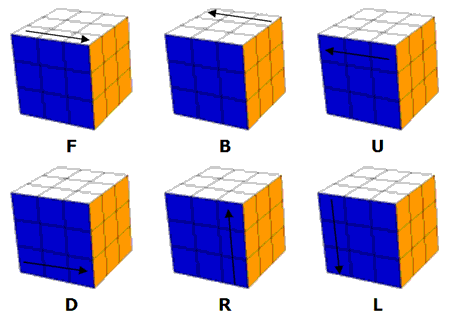
The letters represent clockwise rotations of one of the cube faces. If you need to turn the face anticlockwise, there will be an apostrophe after the letter.
For example, R U' R' means rotate the right face 90° clockwise, rotate the upper face 90° anticlockwise, rotate the right face 90° anti-clockwise.
Step 1 - Solve The Top Layer
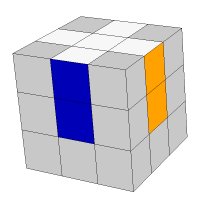
The first stage of solving a cube is to solve the top layer of the cube. Start by finding the white centre square and placing that on the top face of the cube. Add one of the middle edges so that you end up with something like the cube that you see in the diagram below.
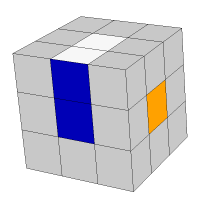
The middle edge placed in the diagram is blue and white. I have rotated the centre layer of the cube to place the blue centre next to this piece. This shows me where the next pieces need to go. In the diagram, the middle edge that joins up the right face is white and orange. I find that and then join that to what I have already.
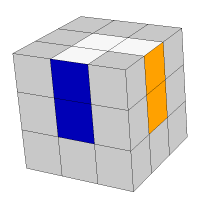
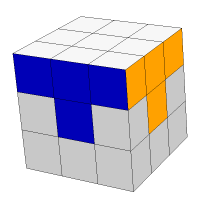
Place the remaining middle edges until you have the cross pattern shown below, with the edges in their correct places.
Now, find and locate the corner pieces and place them where they belong until the whole of the first layer is solved. The T pattern that you see in the image below is what you are looking for.
This stage can take a while if you are totally new to the cube. Be patient and determined. You will need to have some confidence about what you are doing if you are going to be able to memorise these methods later.
Step 2 - Solve The Middle Layer
There are 4 edges to place in the middle layer. Edges pieces have 2 sides and therefore 2 stickers. The edges you are looking for will not have any of the top or bottom layer colours on their stickers.
Left-Hand Sequence
In the image below, there is an edge on the bottom layer of the right hand face. It has a blue sticker showing and a red sticker on the bottom layer. It belongs in the position indicated with a pink dot.
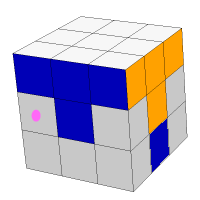
The following algorithm will place the piece where it belongs without messing up the pieces that you have already solved.
L D' L' D' F' D F
Right-Hand Sequence
In the image below, there is an edge on the bottom layer of the left hand face. It has a blue sticker showing and an orange sticker on the bottom layer. It belongs in the position indicated with a pink dot.
The following algorithm will place the piece where it belongs without messing up the pieces that you have already solved.
R' D R D F D' F'
Deciding Which Algorithm To Use
Locate a piece in the D layer which needs to go in the middle layer.- Rotate the D layer until the piece matches up with the face of the colour of the sticker that is not on the bottom face.
- Rotate the D layer once more in the opposite direction of the face of the colour of the sticker that is on the bottom face.
- If you moved the piece to the left, use the right hand algorithm. If you moved it to the right, use the left hand algorithm.
It's hard to explain this, everyone has their own way of remembering things. I turn the piece so that it is on the face of the colour I can see (without looking at the bottom) and rotate the bottom layer once away from the face of the colour I can't see (because it's on the bottom face).
If you have pieces in the wrong place in the middle layer, do the right hand algorithm with that piece facing you on the right of the cube.
Step 3 - Making The Bottom Cross
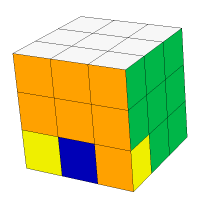
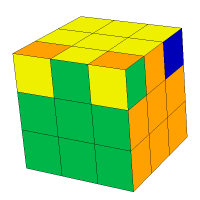
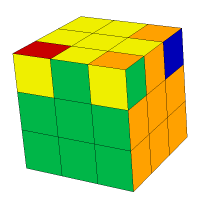
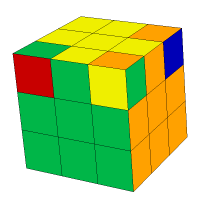
Don't misunderstand, we are not talking about an angry body part - the next stage of the solution is to complete a cross shape on the bottom face. Turn the cube over so that the bottom layer becomes the top. Look at the edges, you should see one of the following four patterns.
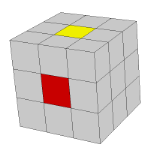
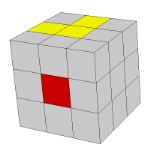
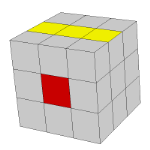
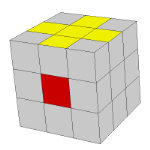
Now that we have solved the first two layers, we have to build up the bottom layer without messing up what we have done so far. Turn the cube over and examine the bottom face. It will match one of the four images below - the corner pieces are irrelevant at this time.
The fourth cube in the diagram is the target state for this section. The move shown below allows you to cycle through each of the four states in order. The square coloured red is there to show you which face of the cube you have pointing towards you when you do these moves. You repeat the move until you end up with the cross that you see in the fourth image.
F R U R' U' F'
Correctly Placing The Cross
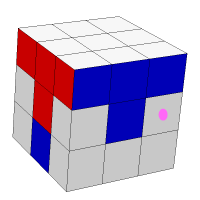
Turn the cube over again so that the unsolved layer is on the bottom.
In the image above, two of the four edges on the cross are in the correct place (the green and red). The algorithm shown below, puts the other two in the correct place. If your cube is not in this state, perform the move until it is.
R' D' R D' R' D2 R D'
Step 4 - Permute Bottom Corners
The next algorithm swaps the bottom corner pieces around until they are in their correct places but not necessarily correctly oriented. Turn the cube over so that the last layer is on top again.
In the image below, the top right corner of the green face is in the correct place. It isn't aligned correctly but it is placed where it should be. The algorithm below places the corner squares of the bottom layer in the correct locations.
U R U' L' U R' U' L
Sometimes it is necessary to perform this move twice to correctly place the corners, sometimes once is enough.
Step 5 - Orient Bottom Corners
The last thing we need to do to solve the cube is to orient the bottom corners. Rotate the top layer until you have one of the incorrectly twisted corners in the front, left position, like the red one in the image below.
There are two algorithms we use to untwist bottom layer corners. If the bottom layer sticker is on the front face, as it is in the image, we use the following algorithm,
D L D' L' D L D' L'
If the bottom layer sticker is on the left face, you do the algorithm below. In the image, the sticker front left corner has green and red stickers showing - the yellow sticker is on the left face.
L D L' D' L D L' D'
Once you place the first corner, turn the top layer anticlockwise until you bring another twisted corner to the front left position. Use one of the algorithms to untwist it. Then repeat this process until all of the top layer corners are correctly oriented.
This final stage is perhaps the most challenging to execute. People often lose concentration in the middle of doing this for the first time. Don't worry if that happens to you. Do whatever you need to to reach the last stage again and then have another go.